

It may look easy but actually it's not! The usual tutorial like the picture below will ask you to setup your studio, to use a dropper, something to hold the dropper, any liquid, colored ink or paper, etc. etc.. etc:
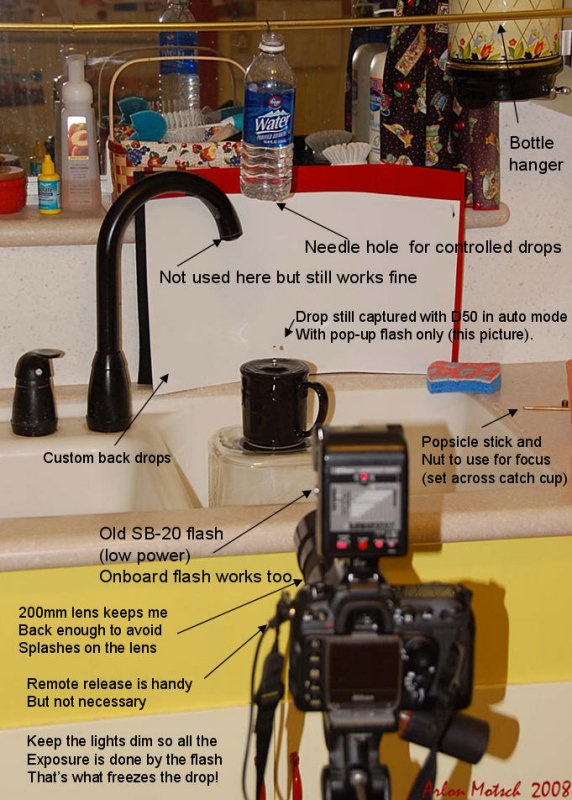 |
| Photo from: http://www.digital-photography-school.com/water-drops-behind-the-shot |
Wow it looks so complicated!!
 What I did?? well I am lazy and stubborn so:
What I did?? well I am lazy and stubborn so:
1) I searched for the room in our condo with the best lighting and realized that it's the bathroom in my room so location.. check!
2) dropper?? nah.. i used my faucet so liquid dropper check!
3) anything to hold the water.. I'm already in the bathroom so I used my scoop and my pail, so check!
4) colored paper or ink to make the liquid pleasing to the eye when photographed.. mine? my scoop is green and my pail is blue.. so color.. check!
5) photographer's bestfriend for this challenge...tripod!! check!
6) wiper... yeah you need this very badly the water will get in your lens!
Well that's all, check some of my work... they may not be the best I know that, but I am proud of the result!


 |
 |


Best to describe this challenge?? back breaking and fun!! Try it!!
Thanks for viewing!! Till next challenge!! 
Check also my other photography challenges!
-Photography: A Self Expression-Macro Photography
-Love Through my Lens
-Pet Photography
-Portraits
|
|
Nice challenge. BTW, I love the set-up. I will try it one of these days. Let's see if I can time my shots properly.
ReplyDeletegoodluck!! for sure you can do it.. hirap lang sa DSLR coz your lenses are quite expensive hirap pag laging nababasa... gamit ka ng transparent sheet to cover your lens para di straight sa lens ang water.. ;)
DeleteI love the idea and the set-up! Galing!
ReplyDeleteI like the 6th picture sis. Besides cooking, photography is one of my frustrations. I just couldn't time my shots well and it ended photoshopped most of the time :-)
ReplyDeleteWOW ulam! Ang galing galing galing galing n_n
ReplyDeleteSino'ng may sabing walang magagawa ang katamaran? Nice job mam VV :)
haha thanks!! yeah if you can do it the easier way then better di ba?? hehe masyadong complicated e puede naman simple lang.. ;))
DeleteI tried and tried figuring out how you did the photo. Good thing you told us here. Otherwise, I won't be able to sleep. Awesome!
ReplyDeletehaha for sure you can do it too KC... patience lang ang sumakit likod ko!! hehe.. :))
Deletewow, you're really good! galing!:)
ReplyDeleteGreat tutorial. I might try it out too. Better find a nice spot to do this.
ReplyDeletethanks sa tutorial, wala bang tutorial about point and shoot digicam
ReplyDeleteHI sis! my camera is almost the same as point and shoot.. i have fixed lens din.. ;)
Deleteang ganda ng pagkakakuha...!! great tutorial..=))
ReplyDeleteThis is great! I've been trying to do this but i find it so hard! Great job! Keep it up!:)
ReplyDeleteastig!
ReplyDeleteAy ang galing!! Nagawa ko din to dati, TSAMBA lang kasi point-and-shoot ang camera ko. haha.. Umuulan nun, tapos feel ko lang magpicture-picture sa pathway namin, kasi ang ganda ng pagbagsak ng ulan. Ayun, nagtry.. nabasa nga ang cmera ko. lol.. pero infairness, achib naman. Tsamba lang yun tlaga. lol..
ReplyDeleteHappy Valentine's Day, ms Violy. :)
nicely illustrated... complicated nga (lol, pero galing ng shots ha. before i try it, i'll by myself first a high definition cam... thanks for sharing. Yahweh bless.
ReplyDeletethis looks so cool! I gotta try this!!
ReplyDeletethank you for sharing this informative post/tutorial :)
ReplyDeletecool! will try this.. i also took water splashes http://freetravelsandtours.com/waters-of-the-pacific-ocean/ ehhehe..but not really as pro as you took :)
ReplyDelete